AMOSConnect(7.4.27)–QuickUserGuide(EnglishVersion)2/43TableofContentChapter1–ConnectionbetweenInmarsatandPC…..…….Page3Chapter2-AMOSConnectQuickInstallation………….....Page42.1–VerifyConnectionPage5Chapter3–AMOSConnectsimpleuserguide...…………..Page73.1–StartAMOSConnectPage73.2–EditingaddressbooksPage73.3–ComposenewemailPage103.4–ComposeFAX(TextOnly)Page143.5–ComposeFAX(Attachment)Page163.6-ComposeTelexPage183.7–DialandconnectPage203.8–CheckconnectionstatusPage22Chapter4–FAQSession..………………………………...Page23AppendixI………………………………………………..
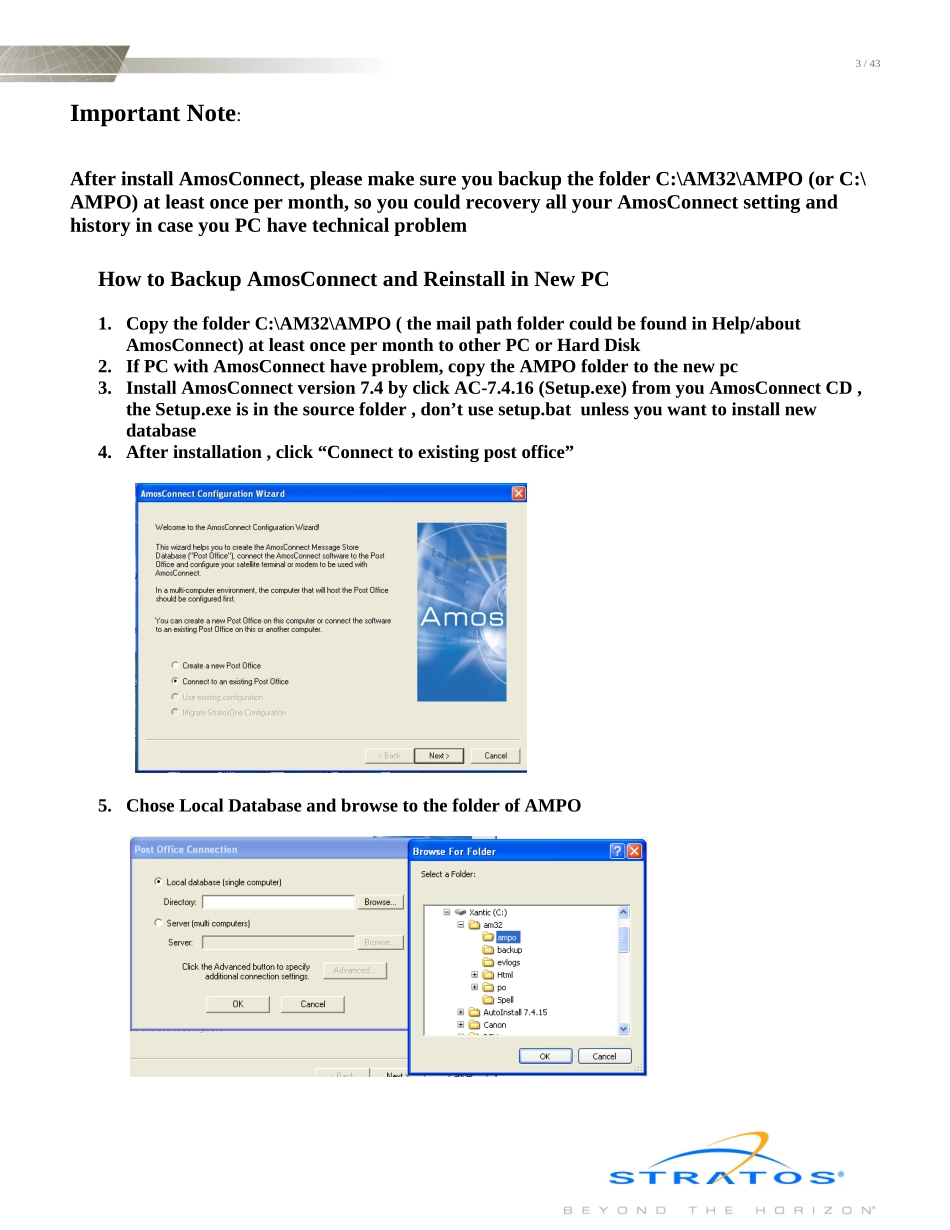
Page363/43ImportantNote:AfterinstallAmosConnect,pleasemakesureyoubackupthefolderC:\AM32\AMPO(orC:\AMPO)atleastoncepermonth,soyoucouldrecoveryallyourAmosConnectsettingandhistoryincaseyouPChavetechnicalproblemHowtoBackupAmosConnectandReinstallinNewPC1.CopythefolderC:\AM32\AMPO(themailpathfoldercouldbefoundinHelp/aboutAmosConnect)atleastoncepermonthtootherPCorHardDisk2.IfPCwithAmosConnecthaveproblem,copytheAMPOfoldertothenewpc3.InstallAmosConnectversion7.4byclickAC-7.4.16(Setup.exe)fromyouAmosConnectCD,theSetup.exeisinthesourcefolder,don’tusesetup.batunlessyouwanttoinstallnewdatabase4.Afterinstallation,click“Connecttoexistingpostoffice”5.ChoseLocalDatabaseandbrowsetothefolderofAMPO4/436.InC:\Am32,orC:\programfile\AmosConnect,findoutfile“ResetDeviceComputer.exe“anddoubleclickit(toresetthemodemdriver)7.YourAmosConnectshouldbefullyrecovered5/43Chapter1–ConnectionbetweenInmarsatandPCInmarsatB:InmarsatMini-M:InmarsatF(RS232DirectConnection):InmarsatF(WithISDNTA):Computer(9PinCOMPort)InmarsatBTerminal(DTEPort)Computer(9PinCOMPort)Computer(9PinCOMPort)Mini-MTerminal(9PinDataPort)Computer(9PinCOMPort)Computer(9PinCOMPort)Inmarsat-FTerminal(ISDNPort)ISDNLineISDNTASerialLineFAXMachine(9Pinor25pin)Computer(9PinCOMPort)Inmarsat-FTerminal(RS232Port)RS232SerialFAXMachineTelephone6/43Chapter2-AMOSConnectQuickinstallation1.PlaceAMOSConnectCDintheCDROMdrive2.Doubleclicktoopen”MyComputer”ondesktop3.DoubleclickonCD-ROMdrive4.Doubleclick“Setup”,awindowwillpopup,keepwaitingduringtheinstallationuntilyouseethemessage‘AMOS-Mailrestored.PleasetrytorunAMOSConnectandconfirm’5.Afterinstallationhasbeencompleted,thewindowwillcloseautomatically.6.ForRe-Installation,followsthesesteps:a)Remove“AMOSConnect”under“Add/RemovePrograms”in“ControlPanel”b)DeletethewholedirectoryC:\am32c)Startinstallationfromstep1Telephone7/432.1VerifyConnection1.Doubletheicon‘AMOSConnect’ondesktop2.Clickthe‘Dail’button,followbythe”Connect”button8/433.Ifnoerrormessagepopupandyoucanseestatisticscount,thatmeanstheconnectionisinprogress.Now,youcanstarttouseAMOSConnect.4.Iferrormessagepopuporyoucannotmakeaconnection,pleaserefertoChapter4–FAQSessionfortroubleshootfortroubleshoot9/43Chapter3–AMOSConnectsimpleuserguide3.1StartAMOSConnect1.Doubleclicktheicon‘AMOSConnect’ondesktop3.2EditingAddressBooks(E-mail,FaxandTelexService)2.Clickthe‘Address’button,the‘AddressBook’windowwillpopup10/433.Clickthe‘New’button,the‘NewDirectory’willpopup4.AddingcontactsinAddressBook:a.AddingEmailaddress:i.Select‘Internet’inthe‘Template’pull-downmenuii.InputtheemailaddressintheAddress.(e.g.TheEmailaddressisservice@xantic.netasshowninthefollowingexample)11/43b.AddingFAXnumber:i.Select‘Fax”inthe‘Template’pull-downmenuii.InputthefaxnumberintheAd...